Introduction to Garlic Bread Rolls
There’s something undeniably cozy about the smell of freshly baked garlic bread rolls wafting through your home. Not only do these delightful rolls make your kitchen feel warm and inviting, but they also have an extraordinary way of bringing people together. Whether it’s a weekend gathering with friends or a late-night snack after a busy workday, these rolls are the perfect homemade treat.
Why Are Garlic Bread Rolls a Perfect Homemade Treat?
First off, one of the best reasons to whip up a batch of garlic bread rolls is the sheer joy of creating something delicious from scratch. They’re surprisingly easy to make, which means even if you’re novice in the kitchen, you can feel like a pro. The combination of warm, fluffy bread and rich, buttery garlic ensures each bite is a heavenly experience.
Imagine taking these rolls out of the oven, golden brown and oozing with flavor. Just the thought makes your mouth water, right? Plus, there’s a flexibility to this recipe that is just enticing. You can customize your rolls to suit your tastes—add herbs like basil or parsley, or try new cheeses for an extra kick. This adaptability means you’ll never tire of them.
Nutritionally, while garlic bread rolls are regarded as an indulgent treat, garlic itself is known for its numerous health benefits. It’s been shown to support heart health and boost the immune system. For an interesting read on the health benefits of garlic, you might want to check out Healthline. By using fresh ingredients, you’re not just satisfying your cravings; you’re treating your body right.
On top of all this, these rolls can easily be paired with various dishes. They complement pastas beautifully, enhance soup dinners, or can simply be enjoyed on their own. The versatility is part of what makes garlic bread rolls a favorite amongst food lovers.
In the end, making homemade garlic bread rolls isn’t just about following a recipe; it’s about the experience. The delightful aroma, the warm texture, and that satisfying feeling of creating something special make these rolls not just a dish, but a celebration of your culinary creation. So, what are you waiting for? Grab your apron, and let’s dive into this delicious journey!
Ingredients for Garlic Bread Rolls
Crafting the perfect garlic bread rolls is both an art and a delightful culinary experience. Here’s what you’ll need to whip up these crowd-pleasers that pair perfectly with pasta, salads, or simply enjoyed on their own.
Essential Ingredients
- Dinner Rolls: Aim for a soft, fluffy variety, preferably homemade or freshly baked from a local bakery.
- Garlic: Fresh is best! About 4-6 cloves, minced, will give your rolls that robust garlic flavor.
- Butter: ½ cup of unsalted butter, melted — this is the magic ingredient that makes everything rich and savory.
- Parsley: Fresh parsley, roughly chopped, adds a pop of color and freshness. You can also use dried parsley if that’s what you have.
- Salt: Just a pinch will elevate the flavors.
- Turkey Bacon or Chicken Ham: For an extra touch, you might consider adding chopped turkey bacon or chicken ham for a savory kick.
- Cheese: Optional, but a sprinkle of mozzarella or parmesan can turn your garlic rolls into something extraordinary.
With these ingredients, you’re set to create garlic bread rolls that are not just delicious but also impressively easy to make. Curious about the method? Keep reading for tips on how to perfect your baking skills!
For more insights on baking essentials, you might enjoy exploring resources like Food Network or BBC Good Food.
Preparing Garlic Bread Rolls
Garlic bread rolls are not just a tasty accompaniment to any meal, but they can also be the star of the table. With a golden crust and a soft, fluffy interior, these rolls are infused with a heavenly garlic butter that makes every bite irresistible. Let’s dive into the detailed steps of how to prepare these delicious garlic bread rolls at home!
Gather Your Ingredients
Before we jump into the fun of cooking, let’s make sure you have everything you need. Here’s a simple list to get you started:
- For the rolls:
- 3 ½ cups all-purpose flour
- 2 tablespoons sugar
- 1 teaspoon salt
- 1 packet (2 ¼ teaspoons) active dry yeast
- 1 cup warm water (about 110°F or 43°C)
- 2 tablespoons olive oil
- For the garlic butter:
- ½ cup unsalted butter, softened
- 4–6 cloves garlic, minced
- 2 tablespoons fresh parsley, chopped
- Salt to taste
Once you have your ingredients, it’s time to embark on this savory adventure!
Make the Garlic Butter
This step sets the stage for that mouthwatering aroma wafting through your kitchen. In a mixing bowl, combine the softened butter, minced garlic, chopped parsley, and a pinch of salt. Mix thoroughly until everything is well blended.
After mixing, consider this: garlic isn’t just delicious—it’s also packed with health benefits, including enhancing your immune system and reducing blood pressure (source: Healthline). So, you’re not just indulging; you’re also treating yourself!
Combine the Dry Ingredients
In a large mixing bowl, whisk together the flour, sugar, and salt. Create a small well in the center and pour in the yeast followed by the warm water. Why warm water? It activates the yeast! Be careful not to use boiling water, as it can kill the yeast and ruin those fluffy rolls.
Knead the Dough
Now, we get a little hands-on! After mixing the dough until it forms a ball, transfer it to a floured surface. Knead it for about 8-10 minutes until the dough becomes smooth and elastic. This process activates the gluten, helping your rolls achieve that perfect texture. Need tips on how to knead? Just think of it as a mini workout for your arms!
Shape the Rolls
Once your dough is ready, it’s time to shape it into rolls. Divide the dough into equal portions—about 12-15, depending on how big you want your rolls. Roll each piece into a tight ball and place them on a greased baking sheet. Keep them close together; they’ll rise even more when baking!
Allow the Dough to Rise
This is the part where we show a little patience. Cover the rolls with a clean kitchen towel and let them rise in a warm place for about 30-45 minutes, or until they double in size. The longer you let them rise, the fluffier they’ll be!
Preheat the Oven
While your tasty rolls are rising, go ahead and preheat your oven to 375°F (190°C). A hot oven is crucial for that marvelous golden crust we all love.
Bake the Garlic Bread Rolls
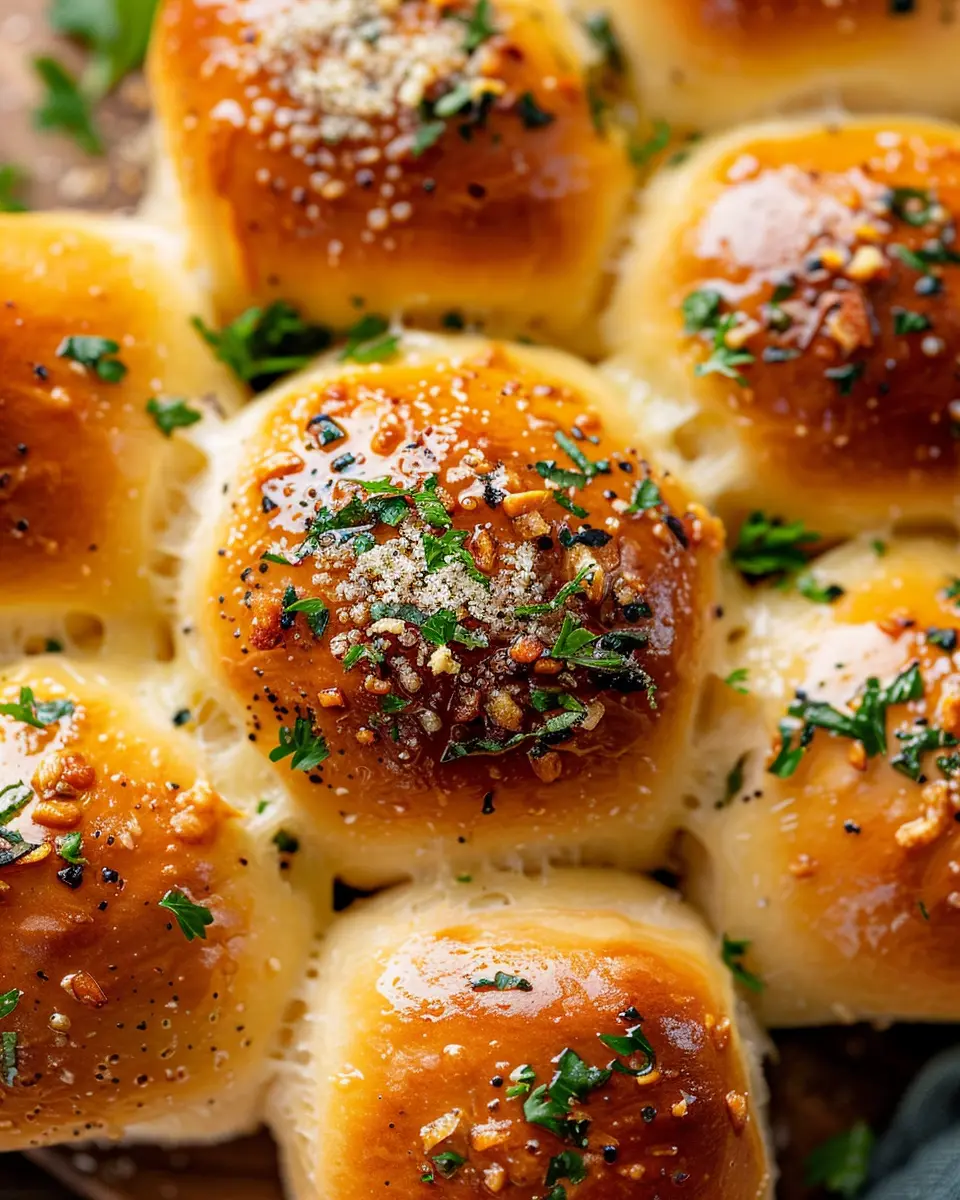
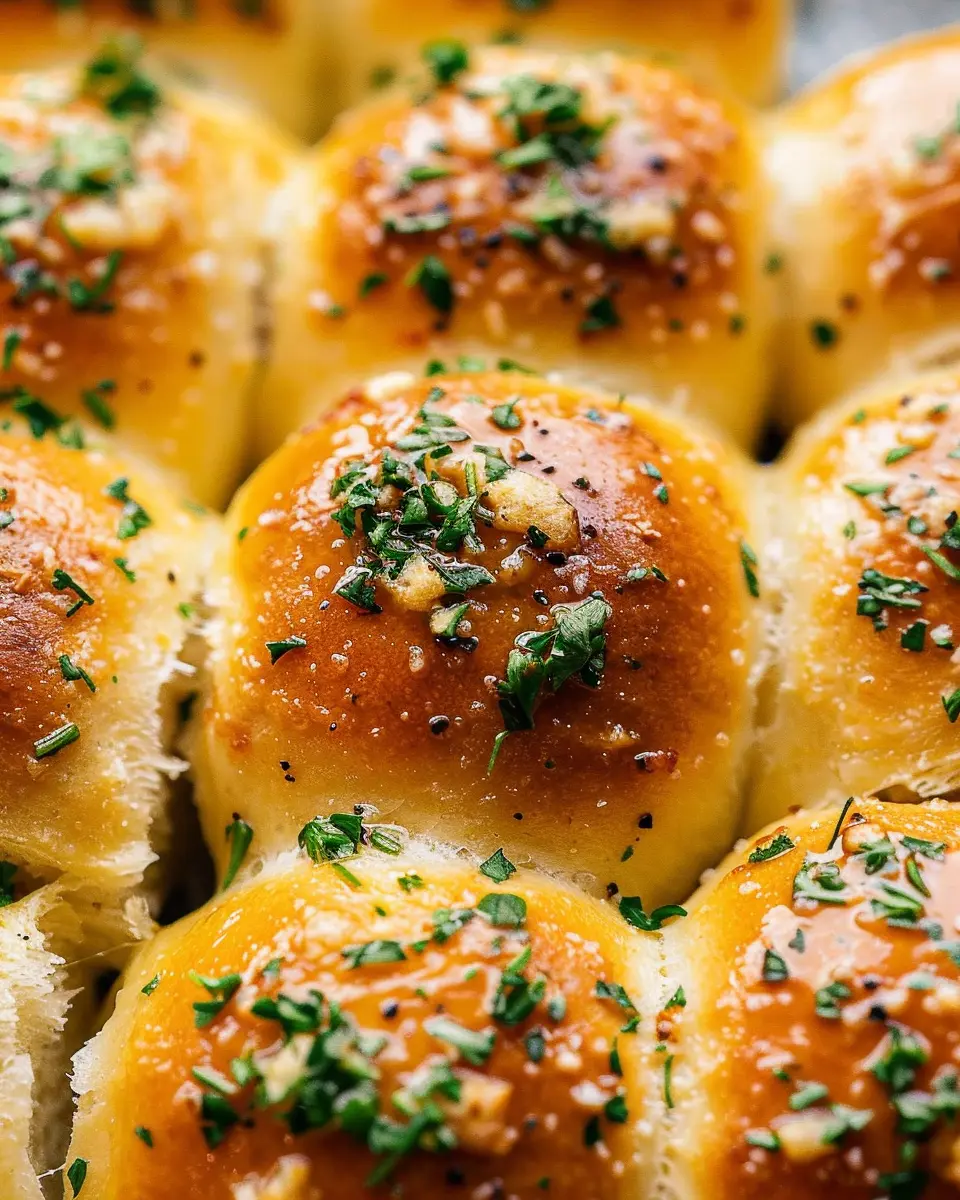
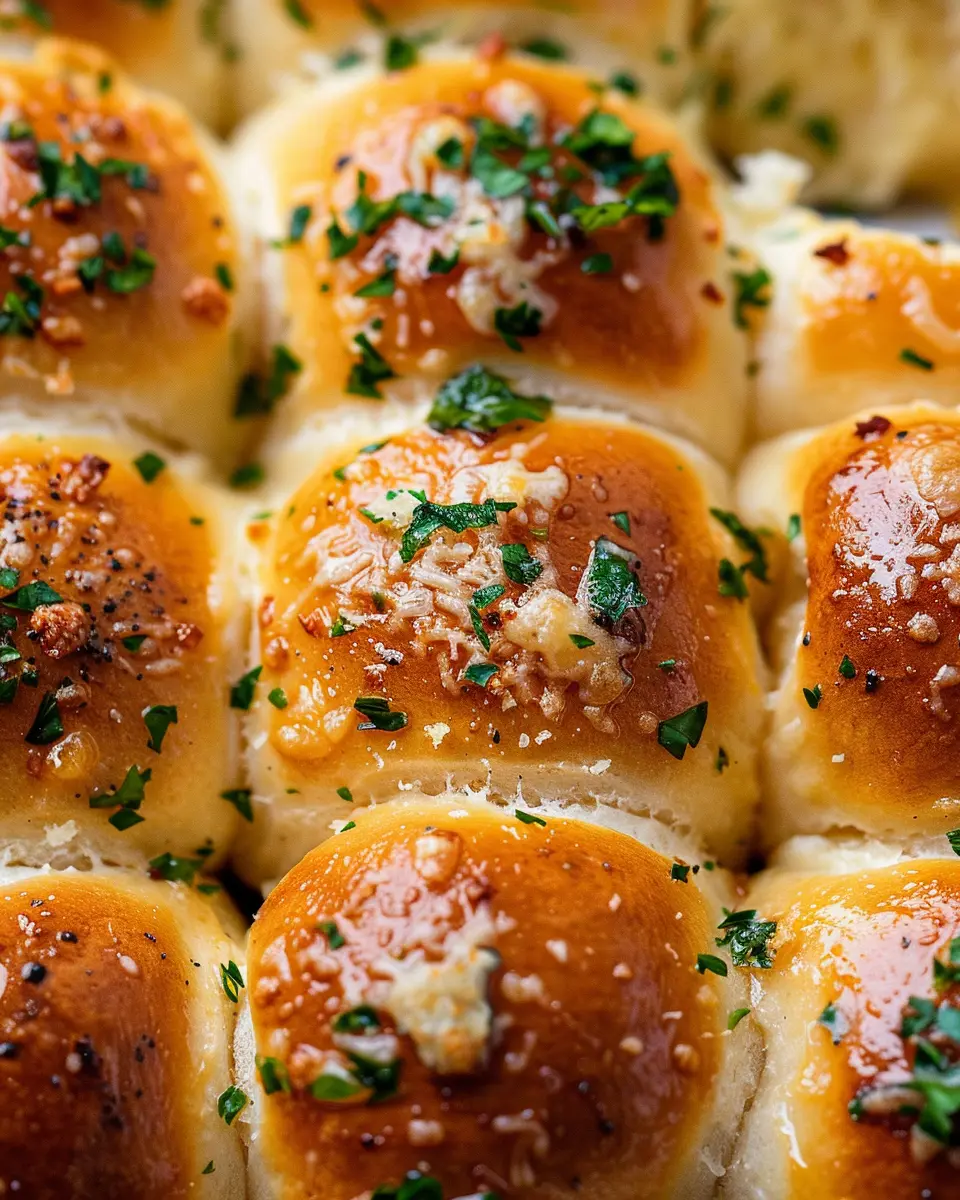
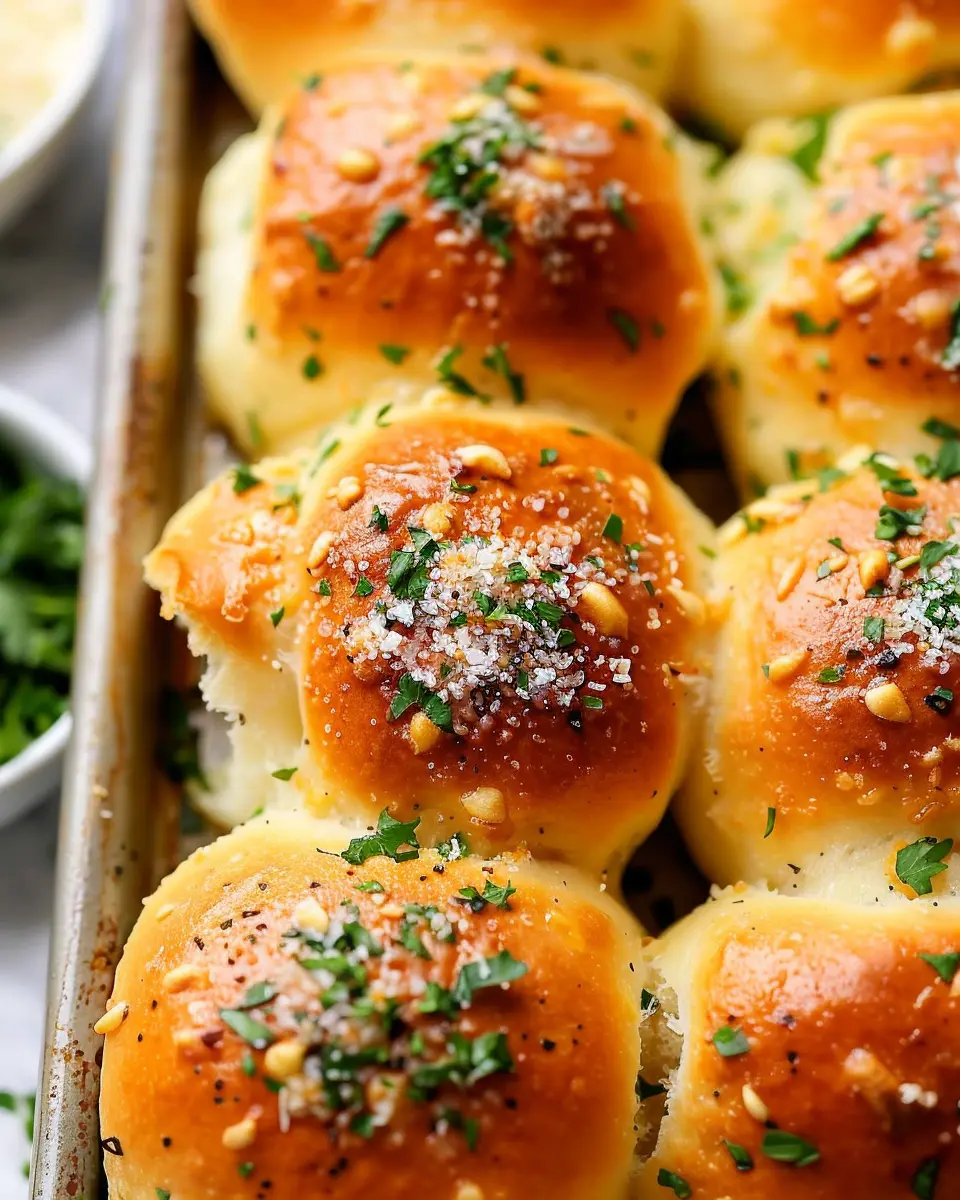
Once the rolls have risen beautifully, it’s time for the star attraction: the oven! Brush the tops of the rolls with your garlic butter mixture and then pop them in for about 15-20 minutes or until they are golden and sound hollow when tapped.
Remove them from the oven, and let the scent of garlic fill your home! Enjoy these rolls fresh out of the oven, maybe alongside a bowl of hearty soup or your favorite pasta dish. If you have leftovers, they make a perfect addition to any meal—just reheat and enjoy. What’ll you fill your rolls with? Give these garlic bread rolls a try, and you might find them quickly becoming a household favorite.
Variations on Garlic Bread Rolls
Garlic bread rolls are a versatile treat, perfect for any occasion, and there are countless ways to elevate them. If you’re ready to explore some delicious twists on this classic recipe, here are two irresistible variations.
Cheesy Garlic Bread Rolls
If you’re a cheese lover, these cheesy garlic bread rolls are an absolute game changer. Imagine pulling apart a warm roll, and gooey cheese stretching tantalizingly. To create this masterpiece:
- Ingredients:
- 1 cup shredded mozzarella cheese
- 1/2 cup grated Parmesan cheese
- A sprinkle of red pepper flakes for a kick
Simply mix the cheeses into your garlic butter and stuff them inside your dough before baking. Consider adding a drizzle of olive oil for extra richness. Pair these rolls with a homemade marinara sauce for dipping or even a refreshing cucumber salad to balance the indulgence. Check out this cheese pairing guide for expert tips!
Herb-Infused Garlic Bread Rolls
For a more aromatic journey, try herb-infused garlic bread rolls. This version invites fresh herbs like rosemary, thyme, or parsley into the mix. Not only do herbs elevate the flavor, but they also make your kitchen smell divine.
- Instructions:
- Chop 1-2 tablespoons of fresh herbs finely and mix them into your garlic butter before spreading.
- Experiment with different herbs; basil or dill can add a delightful twist.
The beauty of these rolls is in their versatility, making them a fantastic companion for a comforting bowl of soup or a fresh garden salad. For more herb inspiration, consider visiting this herb gardening guide to learn how to grow your own.
Unlocking these variations on garlic bread rolls can transform your dining experience, whether for a casual weeknight dinner or an impressive gathering with friends. Happy baking!
Cooking Tips for Garlic Bread Rolls
When diving into the delicious world of garlic bread rolls, a few tips can elevate your culinary experience from good to unforgettable. Here’s how to perfect them:
Choose Quality Ingredients
Start with the best ingredients. Opt for fresh garlic rather than garlic powder for a more robust flavor. High-quality butter also makes a huge difference—just imagine that rich taste melting into the fluffy bread.
Perfecting the Dough
Make sure your dough is not too sticky. If you’re working with a premade dough, let it come to room temperature for easy handling. For homemade bread, the dough should be soft and pliable. Check out this bread-making guide for additional tips.
Master the Garlic Spread
Mix softened butter with minced garlic and a pinch of salt. For a twist, consider incorporating chopped herbs like parsley or basil. This mixture can be spread generously for that perfect garlic bread roll flavor.
Bake with Care
Preheat your oven to ensure even cooking. Baking at a higher temperature (around 375°F or 190°C) will help achieve that incredibly crispy crust while keeping the inside tender. Remember to keep an eye on them to prevent burning!
Happy baking, and enjoy your garlic bread rolls with friends or as a side to your favorite dish!
Creative Ways to Enjoy Garlic Bread Rolls
Garlic bread rolls are fantastic on their own, but with a little creativity, you can take them to the next level. Here are some serving suggestions that will make your meals truly memorable!
Pairing Suggestions
-
Salads and Soups: Enjoy your garlic bread rolls alongside a fresh, crisp salad or a hearty bowl of tomato soup. The flavors are wonderfully complementary, creating a satisfying togetherness.
-
Dips and Spreads: Try serving the rolls with a variety of dips such as hummus, ranch, or tzatziki. These flavorful spreads enhance the taste of your rolls and can turn a simple meal into an appealing spread.
-
Turkey Bacon or Chicken Ham Sandwiches: Transform your garlic rolls into delicious sandwiches! Stuff them with turkey bacon or chicken ham, fresh lettuce, and sliced tomatoes for a quick and satisfying lunch option.
Occasions for Garlic Bread Rolls
-
Game Night: Perfect for casual gatherings with friends. Serve with a side of marinara sauce for dipping to create a fun finger food option.
-
Family Dinners: These rolls are an excellent addition to your holiday table or any family gathering. They’re sure to be a hit with both adults and kids alike.
Easy Customizations
Feel free to customize your garlic bread rolls with herbs or cheeses! A sprinkle of Parmesan or fresh basil can elevate the flavors even more, ensuring every bite is delightful.
For further inspiration, check out additional recipes or tips on using bread in various meals over at EatingWell for a delicious twist!
Time Breakdown for Garlic Bread Rolls
When you’re ready to whip up some delicious garlic bread rolls, knowing the time commitments will set you up for success. Here’s a handy breakdown:
Preparation Time
Expect to spend about 20 minutes getting your ingredients ready. This includes measuring, mixing, and kneading your dough.
Rising Time
Patience is key! Allow the dough to rise for about 1 hour until it doubles in size. This step is crucial for achieving that perfect fluffiness.
Baking Time
Once those rolls are ready to go, they’ll need about 15-20 minutes in the oven. Keep an eye on them until golden brown and fragrant.
Total Time
From start to finish, you’re looking at approximately 1 hour and 40 minutes. It’s a small investment for some mouthwatering garlic bread rolls!
For more tips on perfecting your baking skills, check out the resources from King Arthur Baking or Serious Eats. Happy baking!
Nutritional Facts for Garlic Bread Rolls
When diving into the delightful world of garlic bread rolls, understanding their nutritional value can help guide your culinary choices. Here’s a quick breakdown of what’s packed into these irresistible rolls:
Calories
A serving of garlic bread rolls typically contains around 200-250 calories. This makes them a great side dish or appetizer without derailing your meal plan.
Carbohydrates
Loaded with flavor, a serving also contains about 30-35 grams of carbohydrates. If you’re balancing your intake or following a certain diet, this is a key point to consider. Don’t forget, complex carbs can provide energy for your busy day!
Protein
Although garlic bread rolls aren’t a major protein source, you can expect roughly 5-7 grams per serving. Pairing them with a protein-rich main dish, like grilled chicken or a turkey bacon sandwich, can create a well-rounded meal.
For more detailed nutritional information, consider visiting reputable sources like the USDA FoodData Central or MyFitnessPal. It’s always smart to stay informed about what you’re munching on!
FAQs about Garlic Bread Rolls
Can I make garlic bread rolls ahead of time?
Absolutely! Garlic bread rolls can be prepared in advance. You can make the dough ahead, let it rise, shape the rolls, and then store them in the refrigerator for up to 24 hours before baking. When you’re ready, simply take them out, let them come to room temperature, and then bake as directed. This is a fantastic time-saver if you’re planning a gathering or a busy week ahead. You can also freeze the unbaked rolls. Just ensure they are properly wrapped to avoid freezer burn, and bake them straight from frozen when the craving hits!
How do I store leftovers?
If you find yourself with leftover garlic bread rolls (which is rare but can happen), storing them properly keeps them fresh. Wrap them tightly in foil or plastic wrap, or place them in an airtight container to maintain moisture. They’ll stay fresh in the fridge for about 2-3 days or in the freezer for up to a month. To reheat, pop them in the oven at 350°F (175°C) for about 10 minutes or until warmed through. You’ll be surprised how good they taste even on the second day!
Delicious pairings for garlic bread rolls
Garlic bread rolls are incredibly versatile and can complement various meals. Here are some ideas to elevate your dining experience:
- Soups: Think creamy tomato or hearty minestrone.
- Salads: Pair with a fresh Caesar or spinach salad.
- Pastas: Best served alongside Italian favorites like spaghetti or fettuccine Alfredo.
- Dips: Pair with pesto or marinara for an appetizer.
These ideas can turn a simple meal into something memorable. Check out Serious Eats for more pairing inspiration and detailed guides on complementary dishes!
Conclusion on Garlic Bread Rolls
Garlic bread rolls are a timeless favorite that effortlessly elevate any meal. Perfectly crispy on the outside and soft on the inside, these garlic bread rolls are a versatile side that complements everything from pasta dishes to casual weeknight dinners. With their delightful aroma and comforting flavor, it’s no wonder they’re a staple at family gatherings and dinner parties alike.
As you explore variations, consider adding herbs like parsley or trying out different cheeses for a unique twist. If you’re targeting health-conscious options, you might check out recipes featuring whole grain or gluten-free alternatives. Whatever your choice, these rolls are sure to impress your guests—and yourself. So, why not whip up a batch tonight? Your taste buds will thank you!
PrintGarlic Bread Rolls: Indulgent Homemade Treats for Everyone

Deliciously fluffy garlic bread rolls perfect for any occasion.
- Prep Time: 20 minutes
- Cook Time: 25 minutes
- Total Time: 1 hour 45 minutes
- Yield: 12 rolls
- Category: Bread
- Method: Baking
- Cuisine: American
- Diet: Vegetarian
Ingredients
- 3 cups all-purpose flour
- 1 tablespoon instant yeast
- 1 teaspoon salt
- 1 teaspoon sugar
- 1 cup warm water
- 1/4 cup unsalted butter, melted
- 4 cloves garlic, minced
- 1/4 cup fresh parsley, chopped
Instructions
- Mix warm water, sugar, and yeast in a bowl. Let it sit for 5 minutes until frothy.
- In a large bowl, combine flour and salt.
- Add the yeast mixture and melted butter to the flour mixture. Knead until smooth.
- Let the dough rise in a warm place until doubled in size, about 1 hour.
- Punch down the dough and shape it into rolls.
- Place rolls on a baking sheet and let rise for 30 minutes.
- Preheat the oven to 375°F (190°C).
- Mix garlic and parsley with melted butter. Brush over the rolls.
- Bake in the preheated oven for 20-25 minutes until golden brown.
Notes
- For extra flavor, you can add grated cheese on top of the rolls before baking.
- Serve warm for the best taste.
Nutrition
- Serving Size: 1 roll
- Calories: 150
- Sugar: 1g
- Sodium: 200mg
- Fat: 7g
- Saturated Fat: 4g
- Unsaturated Fat: 2g
- Trans Fat: 0g
- Carbohydrates: 20g
- Fiber: 1g
- Protein: 3g
- Cholesterol: 15mg